Thursday, January 29, 2015

Two For One: Spaghetti Squash and Salmon Patties

I've been making mild attempts to cook for myself more recently, since I've gotten into the bad habit of picking up food on my way home from one of the myriad of kosher grocery stores or restaurants that are within a 2-block radius of my apartment. (As my mom points out, I am lucky that this is an option!) Especially on those weeks when I have a dinner meeting one night, and an event the next night, and dinner plans the next - it almost doesn't make sense (at least, to me!) to buy ingredients and cook for the one night I am home. So I'm just being economical by buying a $15 dinner, instead of spending $15 on ingredients that will just end up going to waste, right? (Humor me.)

So, somehow spaghetti squash made its way into my head last week. I have no idea why - I've literally never cooked with it before. But that was what I wanted to make, and by god, I was going to make it good! (Tomato sauce and cream and caramelized veggies and cheese will do that to any ingredient!) I also decided that I needed a protein to go with it, and decided that salmon patties would win; I have really amazing memories of going to my grandmother's house as a kid for random dinners during the week where she'd serve us salmon croquettes. She'd mash a potato into the mixture and fry up a ton of onions with them. That smell is one that I still remember to this day! Since I can and will never make them as good as my little grandma, I decided to make my own version of her classic - this is not your grandmother's kosher kitchen after all!

Once I finished cooking everything and writing it all down, I realized that by swapping/omitting just a few ingredients, this could be a great Passover dinner! So, guess what I'll be making in a couple months again...if not sooner!


Spaghetti Squash with Creamy Tomato Sauce and Vegetables
serves 2 large portions
 
1 Spaghetti Squash
8 oz. sliced mushrooms
1/2 large onion, chopped
oil
1/2 jar marinara sauce
1/2 cup heavy cream (or half and half)
1/4 cup parmesan cheese
1/2 bag shredded mozzarella
handful of frozen peas (omit if on Passover)

1. Cut the spaghetti squash in half and scoop out just the seeds.
2. Place both squash halves cut side down in a microwave safe dish and fill with 1 inch of water.
3. Microwave for 12 minutes (rotating the dish halfway). Allow to cool for 15 minutes.
4. Meanwhile, sautee sliced mushrooms and onions in oil on medium-high heat, until browned.
5. Add marinara sauce and allow to start to bubble. Stir in cream.
6. Using a fork, scrape the spaghetti squash halves so that all the "spaghetti strands" come out. Save the squash skins to use as a bowl (optional).
7. Add the spaghetti squash strands to the marinara mixture and stir to combine. Add half of the mozzarella cheese, parmesan cheese, and the peas; incorporate.
8. Put half of the squash mixture back into each of the squash "bowls" (optional, or just put into a small casserole dish). Top with remaining cheese.
9. Bake at 425 until cheese is browned, about 10 minutes.


Salmon Patties with cucumber dill sauce
serves 2-3

 
Leftover or store-bought poached salmon (or 1 large can of canned salmon with no bones/skin), flaked - I used 2 store-bought fillets of poached salmon, about 8 oz.)

1/8 cup mayonnaise
1 egg
1/8 cup chopped dill
8 oz. sliced mushrooms
1/2 large onion, chopped
3/4 cup panko crumbs (or more if the mixture feels too loose and doesn't hold together) - (on Passover, use matzo meal instead)

1. In a large pan, sautee mushrooms and onions in oil. (I sauteed the veggies with the spaghetti squash veggies from above, and then just used half in each recipe.)
2. Combine all the ingredients in a bowl. (If the mixture is very moist, add more panko.)
3. Form patties; I got 5-6 from this mixture.
4. Heat 1/4 oil in a large sautee pan; pan-fry the patties for 2-3 minutes on each side, until golden brown.
5. Serve warm with cucumber dill sauce.

Cucumber Dill Sauce
3/4 cup mayonnaise
1/8 cup sour cream
1/4 cup chopped dill
1 persian cucumber, peeled and seeded, chopped very finely
1/2 tbsp. dijon mustard (omit if on Passover)
1/2 tsp. chopped garlic
salt and pepper
1/4 cup cream (or milk or water)

Combine all ingredients, adding cream (or milk or water) until desired consistency. Refrigerate for at least 30 minutes.


Monday, January 5, 2015

Crisp-Filled Apples


Happy new year! I figure, new year, new recipe, new blog post - let's see how long I can keep this up!

After a month of Chanukah parties, family holiday gatherings, work events, volunteer events, travel, huge Shabbos meals, New Year's parties, and more, I was D-O-N-E. I spent my final day before heading back to work after the long New Year's weekend wandering the aisles of the grocery store, before heading home and cooking for a few hours, and finally eating the fruits of my labor - literally! - while watching Real Housewives and Downton Abbey. What did YOU do that sounds any better??

I don't always have one, but yesterday, my sweet tooth was out in full force. I wanted to bake something warm and comforting to battle the snow and arctic blast that are heading our way this week. But, being that it's right after New Year's, and there are all these resolution shmesolutions, I wanted something that seemed a little healthier. So fruit, specifically, baked apples, sounded perfect to me! But then I kinda mucked it all up (and by "mucked it all up," I mean that I made it infinitely more tasty!) by adding brown sugar and oats and margarine and cinnamon and all the best parts of an apple crisp, stuffed inside a hollowed-out apple, baked with a gooey caramel sauce on the bottom, served it warm and steamy, and topped it all off with a nice scoop of vanilla frozen yogurt (because, moderation) on top. And: scene.

Fresh out of the oven, all hot and crackly and bubbly

The perfect crisp-filled apple

Check out that baby sliced open - filled with all that crisp topping. It's the perfect bite, every time!
Crisp-Filled Apples
serves 4

Crumb topping:
4 tbsp. margarine, room temperature
3/4 cup oats
1/2 cup brown sugar
1/2 cup flour
1 tsp. cinnamon

4 apples
1 tbsp. margarine
Sprinkle of cinnamon
1/2 cup water

Caramel syrup:
3 tbsp. margarine
1/4 cup brown sugar
1/2 tsp. cinnamon

1. Make the crumb topping: combine all topping ingredients by hand until fully incorporated and crumbly. Set aside.
2. Prepare apples: slice a small slice off the bottom of each apple to level the apples so they stand upright.
3. Using a paring knife, carve a circle around the stem of each apple, about 1 inch down. Using a spoon, scoop the inner stem part of the apple out to create a "bowl" to hold the filling. Do not scoop all the way to the bottom, but go pretty far down to be able to pack more crumb topping in there!
4. Pack 1/4 of the crumb topping into each of the apples, packing down.
5. Prepare caramel syrup: in a microwave-safe bowl, melt the margarine, brown sugar, and cinnamon for 30 seconds, or until the margarine is melted, then stir to fully combine.
6. Grease an 8"x8" dish and pour the syrup on the bottom. Arrange the apples on top.
7. Thinly slice the remaining 1 tbsp. of margarine and put a slice on top of each apple. Dust the entire dish with cinnamon.
8. Pour the 1/2 cup of water into the bottom of the dish. Bake at 350 degrees for 45 minutes, or until the apples are soft and begin to crack.
9. Serve warm with a scoop of ice cream and the caramel sauce drizzled on top.
 

Tuesday, November 25, 2014

Recipe Revamp: Pumpkin Bread Pudding

One of the earliest recipes I posted to this blog was a Pumpkin Praline Bread Pudding with Cinnamon Sauce. It was good and I very much remember enjoying it. But, I'm not gonna lie - I haven't made it since I posted it. That tends to happen to me with new recipes - I love them, people rave about them, and then I never make them again because there are so many new recipes out there to try!

Until a few weeks ago. I was assigned dessert for a meal I was co-hosting and, I don't even have to say it: it's fall, I'm obsessed with pumpkin, there was no way this dessert was going to be anything other than pumpkin-based. After referring to my old pumpkin bread pudding recipe and reading all my little notes about what I'd do differently, I decided to just do things differently from the get-go. I tweaked quantities, changed the topping, and - most significantly - I completely changed the accompanying sauce. My tastes have matured a bit since this blog began, and even though I'm not a whiskey fan myself, I can definitely appreciate the flavors of bourbon in a spicy pumpkin dessert. So, here she is: my updated Pumpkin Streusel Bread Pudding with Sweet Bourbon Sauce.


Pumpkin Streusel Bread Pudding with Sweet Bourbon Sauce
Serves 12

1 challah (I used a cinnamon crumb challah, but a large plain challah is just fine too)
1 1/2 cups pumpkin puree (NOT pumpkin pie mix)
3 cups non-dairy milk (I used original flavored rice milk)
4 eggs
1 cup sugar
2-3 tsp. cinnamon (I always err on the side of cinnamon)
1 tsp. nutmeg
1/2 tsp. ground ginger

For the streusel topping:
4 tbsp. margarine, softened
1/2 c. flour
1/2 c. brown sugar
1 tsp. cinnamon

For the Sweet Bourbon Sauce
1 stick margarine
1 c. sugar
1 egg
2 tbsp. bourbon

1. Preheat oven to 350 degrees.
2. In a large bowl, mix together the pumpkin puree, milk, eggs, sugar, cinnamon, nutmeg, and ginger.
3. Cut the challah into 1-1.5" cubes and place in the pumpkin mixture. Mix well so all the challah cubes are covered; set aside to absorb.
4. Meanwhile, make the streusel topping. In a small bowl, mix the streusel ingredients by hand, so that they become crumb-y (pea-sized).
5. Pour the bread pudding into a greased 9"x13" pan. Drop the streusel mixture on top to cover.
6. Bake for an hour, checking after 50 minutes with a knife to see if the pudding has set.
7. To make the Bourbon sauce, melt the margarine in a small saucepan with the sugar over medium-high heat. Once the sugar has dissolved, add the egg and whisk continually for 2 minutes, so that the egg doesn't scramble. The mixture will thicken a bit. Remove the sauce from the heat and whisk in the bourbon.
8. Serve individual portions of warm bread pudding with room-temperature bourbon sauce on top.

Monday, November 24, 2014

Spectacular Spuds

I am of the opinion that no meal is complete without carbs. I come from a long line of women who would routinely prepare fantastic Shabbos and yuntif meals that were accompanied by a potato of some sort and a rice of some sort and some other version of a non-Atkins approved food item. Because that's just comfort. So when a friend asked me to prepare a potato dish for a recent yuntif meal, I was more than happy to oblige.

Mashed potatoes are kinda just the perfect blank canvas. They go with sweeter sauces and more savory items; they are the perfect bed for chicken, beef, fish, everything. But they can be sorta...blah. So I just started sauteeing and adding and mixing and, before I knew it, I had The Perfect mashed potato. I don't use that term lightly, so you need to trust me on this. Caramelized onions, garlic, and mushrooms added amazing sweetness and texture, and the combo of margarine, pareve sour cream, and chicken stock made for a very flavorful and moist dish - which I was a especially worried about because I made these several days before they were going to be eaten, and I knew they'd be reheated for several hours. (Nothing worse than a dry, chalky mashed potato. Priorities, people.) And then, how can you go wrong by adding crispy fried onions on top? I mean, you can't.

These flew off the table. And then I started giving out the recipe (which meant that I had to actually write down the recipe.) And then I made them again. And again. And now I gift them to you. You're welcome.


Caramelized Onion and Mushroom Mashed Potatoes
serves 12

5 lbs. potatoes
2 10-oz. containers of mushrooms, sliced
1 large onion, sliced thin
1 tbsp. minced garlic
oil
1 stick of margarine
1 12-oz. container of pareve sour cream
1-2 cups chicken stock (I've used both real chicken stock and the fake stuff. Both work fine.)
salt and pepper to taste
1 cup of French's Fried Onions, for serving
1. Heat oil in a pan and sautee the mushrooms until caramelized on medium high heat, about 20 minutes. (They will release a lot of liquid at first. Continue cooking until all the liquid is gone and the mushrooms brown up.) Set aside.
2. In a separate pan with additional oil, caramelize the onions and garlic on medium heat, about 15 minutes. Set aside.
3. Meanwhile, peel the potatoes and cut them into 1.5" pieces. Put them in a large pot and cover with water and bring to a boil. Boil until soft, about 10 minutes; drain and put back into the hot pot to evaporate excess water for 2 minutes.
4. Transfer the potatoes to a large bowl and begin to mash with a masher. Add margarine and sour cream while the potatoes are warm and incorporate.
5. Add the caramelized vegetables and chicken stock.
6. Season with salt and pepper to taste. (Potatoes are bland can handle quite a bit of salt.)
7. Serve on a platter with crunchy onions on top.

Monday, October 13, 2014

Punkey Bread

Happy Columbus Day! Or, as I like to call it: Happy There's-Nothing-Different-About-Today-For-Me-Because-I'm-Still-At-Work Day :-) We are heading into the final stretch - three sets of yuntif down, one more to go! For those of you counting, that's 14 yuntif meals (including pre- and break-fasts) eaten so far - thank goodness for a little dancing later this week to burn off some of those calories!

This is actually one of my favorite times of the year. Rosh Hashana brings tons of family to Harrisburg and to my house, and Sukkos has always been a special holiday in my neighborhood and in my community. So, to be honest, I'll be sad when it's all over next week!

This time of year is also fun because I get to play around in the kitchen and come up with some new recipes. This Sukkos, with its 65 degree weather and the leaves finally changing, I was craving - you guessed it - pumpkin. I can't help it: pumpkin makes me think of fall, fall makes me think of pumpkin, it's all just one big happy family to me.

I ran into a friend of mine last week who makes this really delicious Monkey Bread. For those of you unfamiliar with the term, get familiar ASAP - it's either balls or chunks or layers of bread dough, baked together (usually in a bundt pan) with some flavoring in between all the layers. You can just pick off individual chunks of bread to serve - so great for the food pickers in my life! (I love you all :-P) After I saw my friend, I thought about asking her for the recipe, but then I decided that it's much more fun making something that I have no idea how to make....especially in my mom's kitchen. She loves that. I also decided that I wanted to add pumpkin to really bring out the it's-finally-fall feeling.

Secret ingredient: Kineret Frozen Challahs. The same challahs of Cinnamon Bun fame. They are so versatile; why go making challah dough when you have great challah dough so readily available? Just defrost them in the fridge for a few hours and you're good to go.

Okay, so here's the thing. I had this whole grand plan in my head about how perfectly this was going to work out. But you know how it goes, "man makes plans...." I was going to mix up some pumpkin and melted margarine:


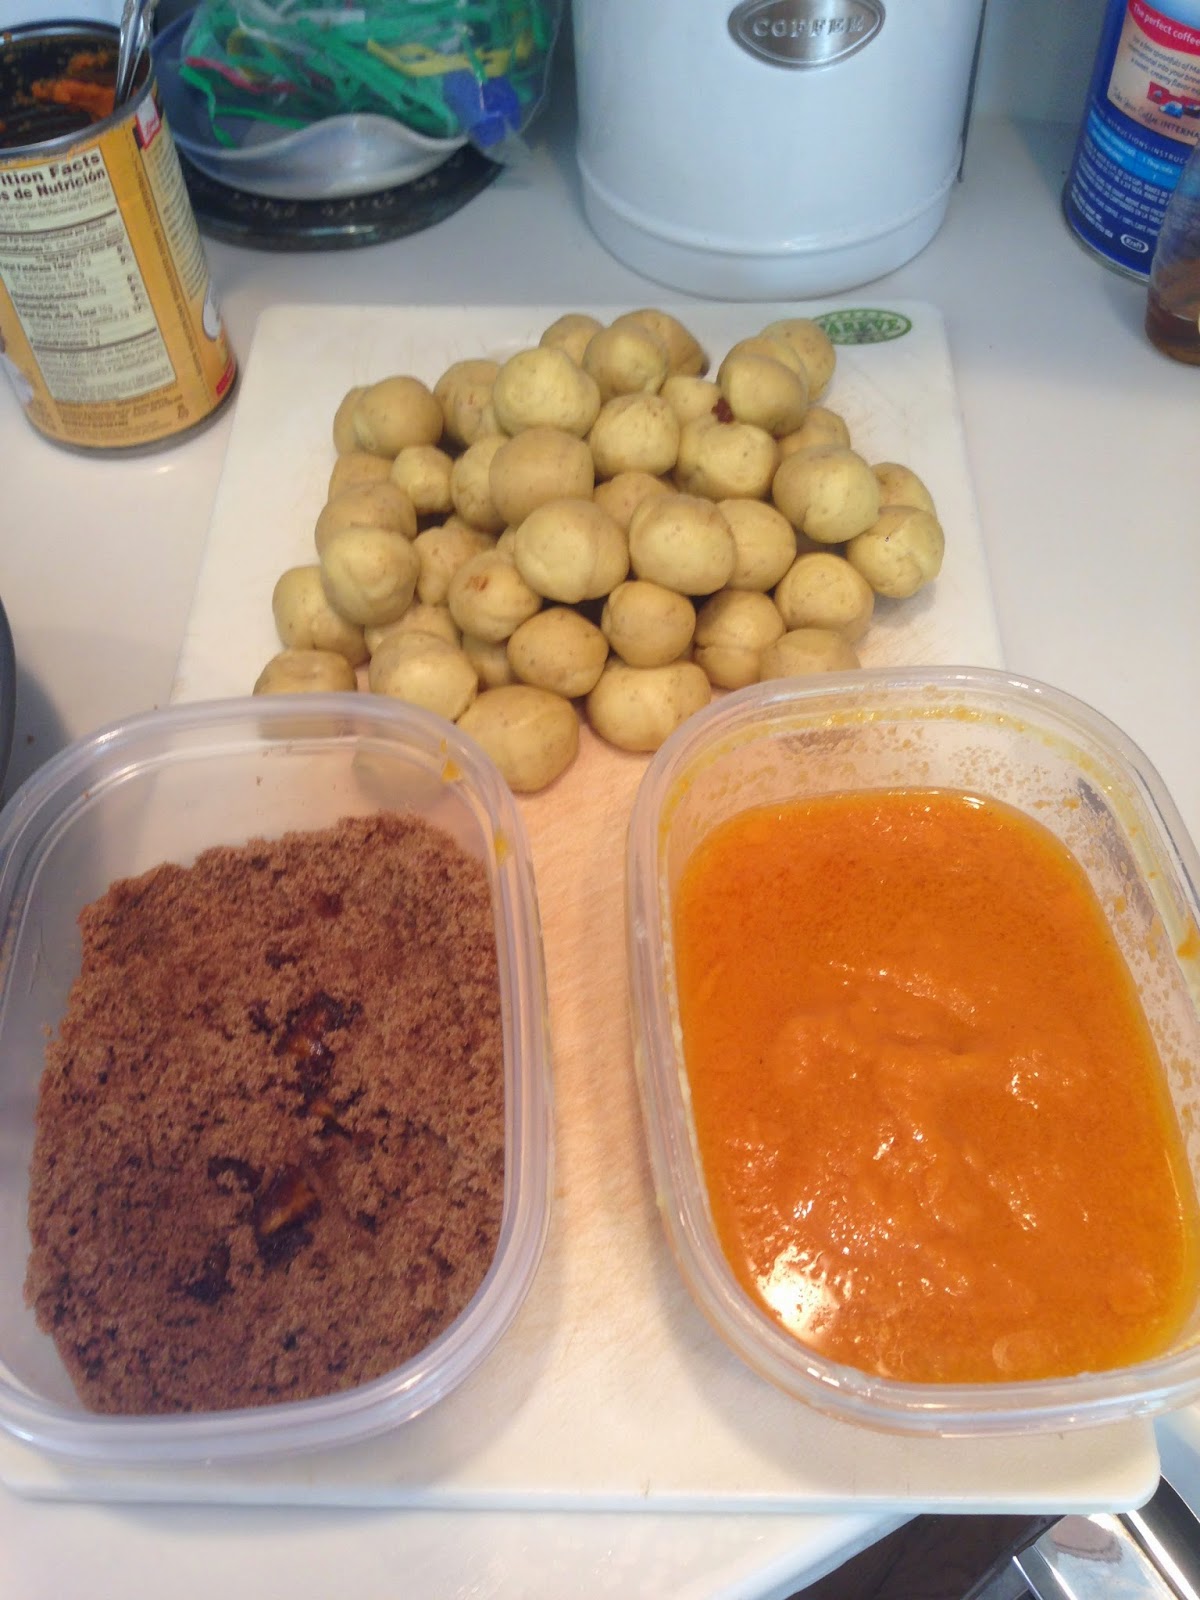
And then mix together some brown sugar, pumpkin pie mix, and cinnamon:
  
Then, I was going to separate the defrosted challahs into their individual (6) strands:


Before cutting each strand into 6 pieces, and then rolling the pieces into balls:


So far, so good. My work station looked beautiful:


So, I start dipping the balls into the pumpkin and then rolling into the sugar mixture. 

But that's when things went....icky. The pumpkin and the sugar combined into this sugary brown paste. 

Instead of starting over, though, I decided to just go with it. I mixed together all the pumpkin-margarine with all of the sugar-spices and just kinda rolled the dough balls in that. Roll, drop, repeat - 72 times (because I used two challahs), until the pan was full:

I let the dough rise for about an hour on the warm oven, and then I baked it. It rose almost to the top and smelled ah-mazing:

After a quick cool-down (I was really cutting it close to yuntif, but I needed to flip it out and get a photo in!), I turned it out and voila! The pumpkin-sugar made this sticky caramel glaze that coated (what was now) the top of the cake, and the dough balls were all perfectly covered in a spicy-sweet deliciousness. It was the perfect dessert to have around for the next 3 days just to pick at haphazardly. And we did. Oh did we ever.


Punkey Bread
The recipe that follows is the recipe that I ended up using (and not what I originally intended to do). It worked great, but if I tweak it going forward, I will update this blog post!

2 Kineret frozen challah doughs, defrosted in the refrigerator for 4 hours)
1 stick of margarine, melted
7 oz. (half a can) of pureed pumpkin (NOT pumpkin pie mix)
1 cup brown sugar
1 tbsp. pumpkin pie mix
1 tsp. cinnamon

1.  Mix together the (cooled) melted margarine, pumpkin, brown sugar, pumpkin pie mix, and cinnamon. Set aside.
2. Carefully separate the challahs into their individual (6) strands, and cut the strands into 6 pieces each. Roll the sections into balls. (You should have 72 dough balls.)
3. Dip each dough ball into the pumpkin-sugar-spice mixture and drop into a greased bundt pan. Continue this process using all the dough balls, and make sure to evenly distribute the dough balls around the pan.
4. Allow the monkey bread to rise for 45 minutes to 1 hour.
5. Bake the monkey bread in a preheated 350-degree oven for 45-50 minutes, or until the top is browned.
6. Cool for an hour, and then flip onto a cake plate to serve.

Sunday, September 21, 2014

Apple-Cinnamon Stuffed Challah


By popular demand, I present to you a creation I am pretty proud of. A few years ago, I got it into my head that I wanted to make challah for Rosh Hashana. But, being Rosh Hashana, I wanted to do something a little bit more special than your average round challah. (Though I will say that, as a very proud Harrisburg native, I am completely spoiled when it comes to challah, since we have, hands down, one of the best challah bakers living just a few blocks away and from whom we buy challah every Shabbos.) I decided to somehow stuff apples into a challah, and after some trial and error over the years (and several good tips that I've picked up along the way), this recipe was born. I'm so excited to bring six of these babies home for Rosh Hashana and to spend time with my family and friends this week. Shanah Tovah to everyone!

Apple-Cinnamon Stuffed Challah
The base recipe for my challah is Joan Nathan's challah recipe, which was published by the New York Times several years ago. I think this recipe isn't too sweet, which is great because the apples definitely add some sweetness to it. It's also dense enough to stand up to the extra weight of the apples.

One recipe makes 3 challahs of this size, so I doubled the recipe in order to get 6 medium-large challahs. This year, I did a 3-strand braid (though in the past, I've done 4- and 5-strand braids. But because of all the apples inside, 3 strands still makes a pretty wide challah.)

1 ½ packages active dry yeast (1 1/2 tablespoons)
1 tablespoon plus 1/2 cup sugar
½ cup vegetable oil, more for greasing bowl
5 large eggs
1 tablespoon salt
8 to 8 ½ cups all-purpose flour
3 apples, peeled and chopped finely (I used Red Delicious)
1/4 cup sugar
½ tbsp. cinnamon

1. In a large bowl, dissolve yeast and 1 tablespoon sugar in 1 3/4 cups lukewarm water.

2. Whisk oil into yeast, then beat in 4 eggs, one at a time, with remaining sugar and salt. Gradually add flour. When dough holds together, it is ready for kneading. (You can also use a mixer with a dough hook for both mixing and kneading.)

3. Turn dough onto a floured surface and knead until smooth. Clean out bowl and grease it, then return dough to bowl. Cover with plastic wrap and let rise in a warm place for 1 hour, until almost doubled in size. Dough may also rise in an oven that has been warmed to 150 degrees then turned off.


4. Punch down dough, cover and let rise again in a warm place for another half-hour.


5. Meanwhile, during the second rise, peel and chop apples finely. Toss with 1/4 cup sugar and cinnamon. Important tip: Put apple mixture into a strainer and allow the juices to drip out. (The addition of the sugar draws out a lot of liquid from the apples which, if not drained, will make the challah very soggy.)

6. Divide dough into 3 equal sections (one for each challah). Divide each of those sections into 3 even balls and roll the balls into long strands, about 12 inches long. Flatten the strands with the palm of your hand, and fill with a line of the strained apple mixture.


7. Fold the dough around the apples and seal tightly, rolling a bit to even out the seams. (Roll the dough in some flour if it seems like it's getting sticky.) Repeat with the remaining two strands.


8. Braid the challah and tuck the corners under to seal the braid. Place challah on a greased cookie sheet and brush with egg wash (made from the remaining egg). Either freeze breads or let rise another hour in refrigerator if preferred.

9. To bake, preheat oven to 375 degrees and brush loaves again. Dust challahs with a mixture of cinnamon-sugar (optional; 1/4 cup sugar + 1 tbsp. cinnamon).


10. Bake for 40 to 45 minutes, or until golden, rotating halfway through. Cool loaves on a rack.


Wednesday, March 19, 2014

Moroccan Magic

Well, we're less than 2 weeks away from the Manischewitz All-Stars Cook-off, and now that I'm up on their website, I guess it's really official! For anyone who is in NYC and would like to attend the cook-off on March 27, please just send me a message to let me know - I'd love to have you there in my cheering section!

Just because I still need to perfect my Latke Crusted Chicken with Apple Cider, Mushroom and Rosemary Sauce doesn't mean that I can't have other recipes on my mind too! Gotta think about next year's cook-off ;-)

I had some people over for Shabbos lunch this past week and was a little sick of cholent (even though I do make a really good cholent, ifImaysaysomyself). But I also figured that throwing all the ingredients for whatever I was making into a crockpot on Friday afternoon and walking away would make my life super easy. I settled on a Moroccan chicken with lots of spices and Middle Eastern-inspired flavors. But then around 3:30 PM on Friday, after panicking for six hours that my chicken would dry out by lunchtime on Saturday after cooking for 17 hours, I decided to just bake everything and re-heat it on a hot plate for lunch. (These are literally the things that keep me up at night: "will my chicken dry out?")

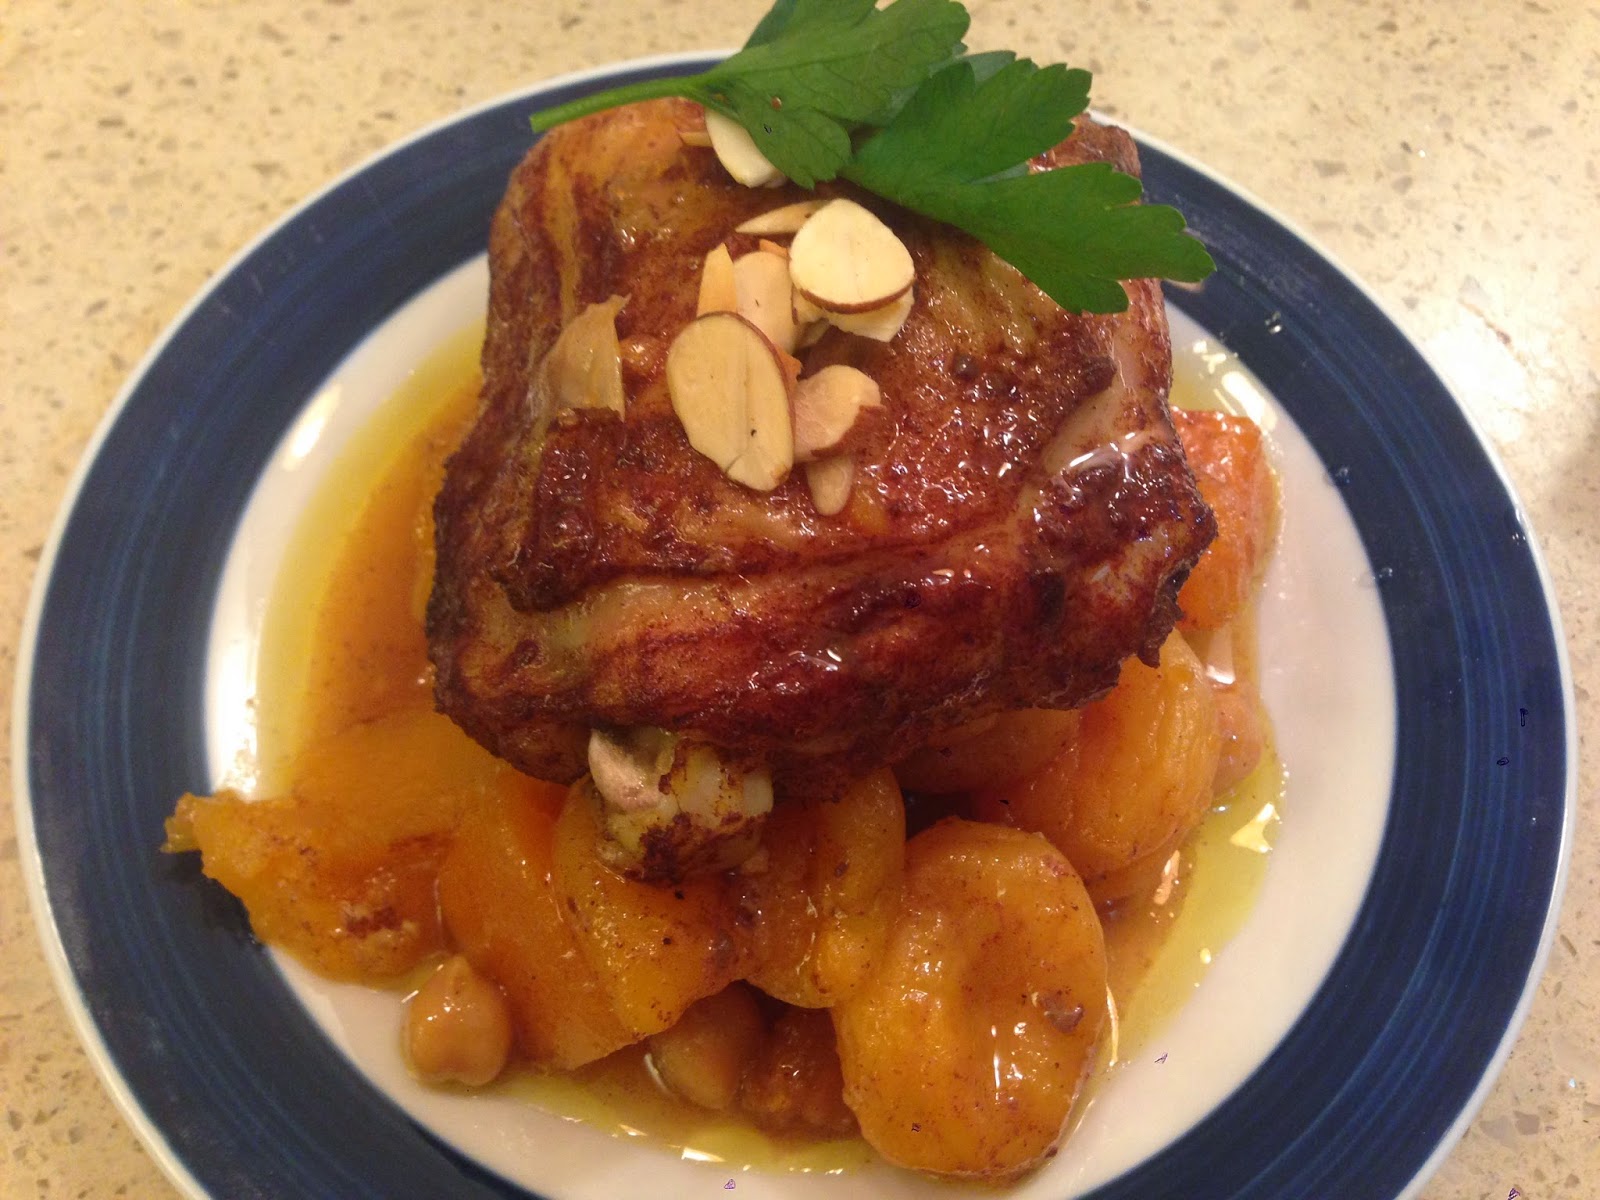
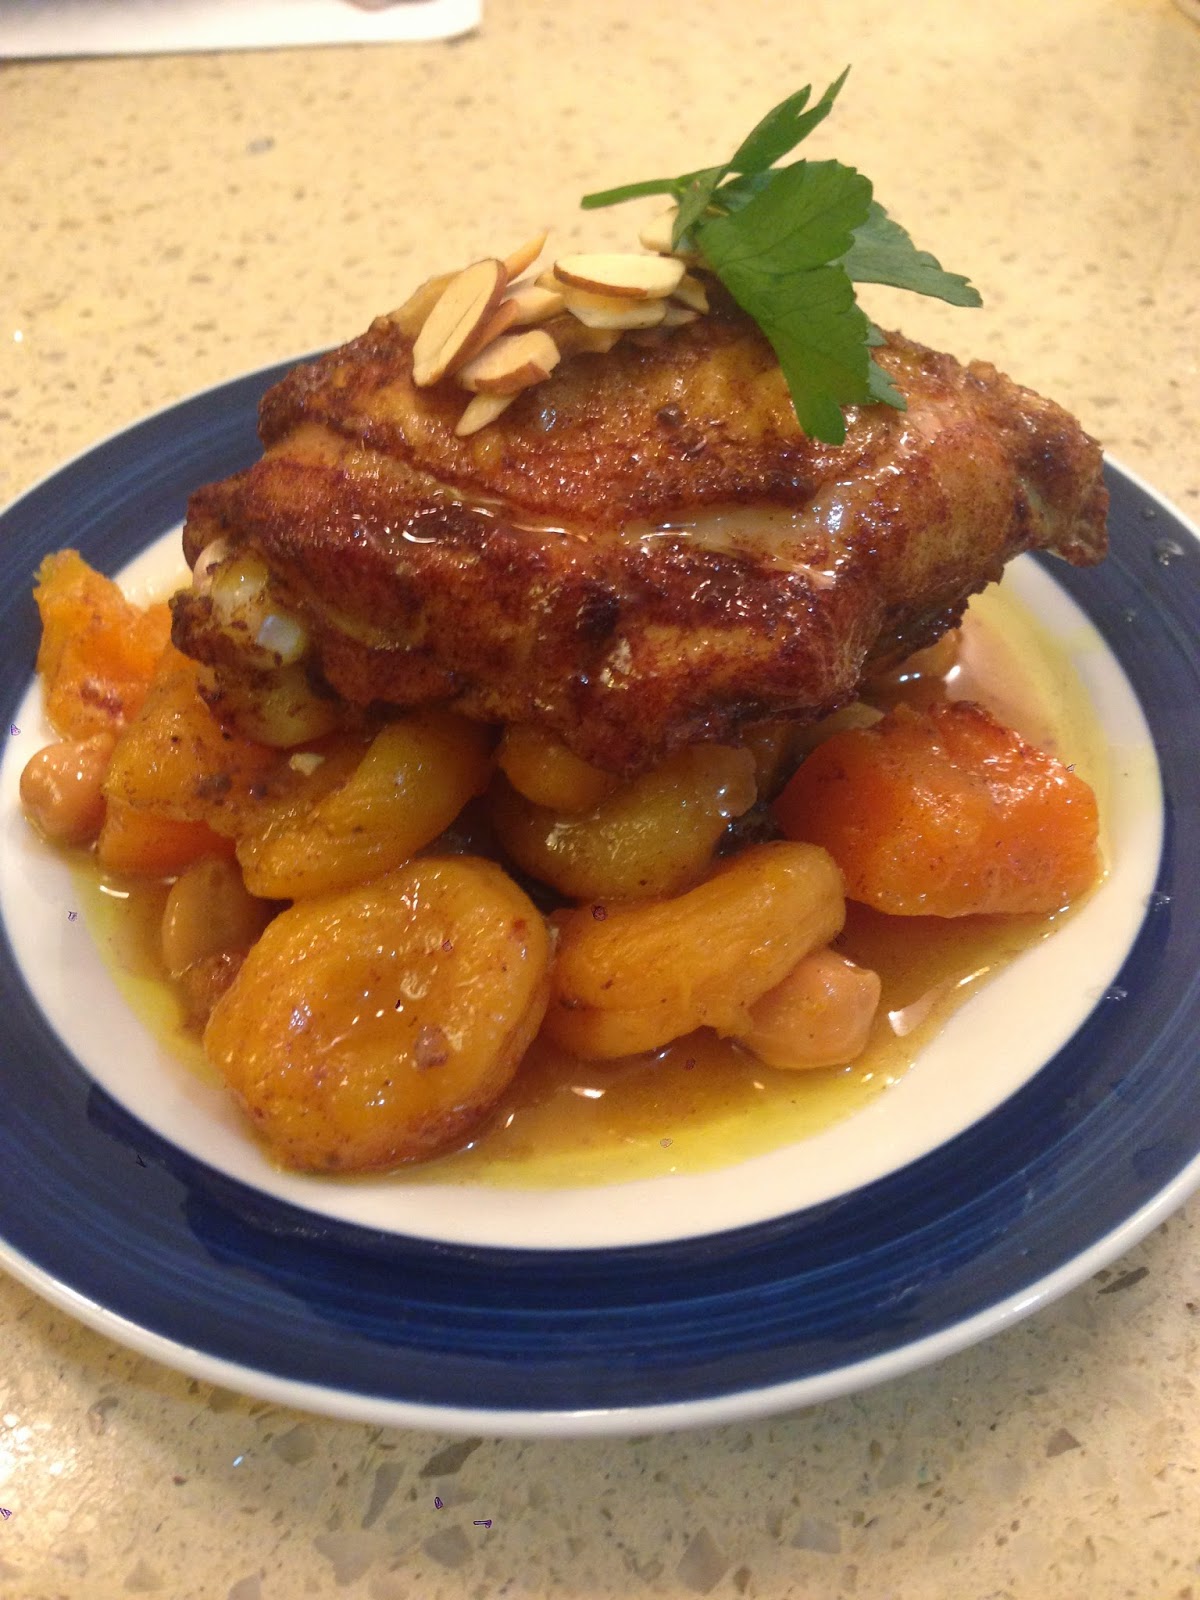
I decided to make this dish with bone-in chicken thighs because the dark meat tends to be moister than chicken breasts, and since this was going to be re-heated the next day for several hours, I didn't want anything to be too dry. But if you're making this dish and serving it right away, use whatever cut of meat you prefer. (A whole chicken cut into 1/8's would work great, too.) I would, however, recommend using bone-in chicken (and not boneless) since the veggies underneath the chicken need to cook for quite a while, and boneless chicken will almost certainly dry out. I also kept the skin on because I love crispy skin, but you could remove the skin and it would still be great - in fact, the spices will permeate the meat even more and probably be extra yummy. Serve this over some rice or couscous and you have a really lovely tagine-inspired meal.

This is such a good, healthy, colorful, pretty dish - so pretty, in fact, that I totally forgot to garnish the serving platter with the toasted sliced almonds and chopped parsley that I literally prepped and had ready just for this meal. Such is my life..... (The instructions for the garnish are included anyway!)


Moroccan Chicken
serves 8-10

1 lb. butternut squash, cut into 1 inch cubs
1 small onion, chopped
1 cup dried apricots (cut in half - optional)
1 can chickpeas, drained
1/2 cup raisins
salt and pepper
3/4 cup canola oil, divided
4 tsp. cinnamon
1 tbsp. cumin
1 tsp. turmeric
1 tsp. cayenne pepper
3 lbs. chicken on the bone with skin (any combination of pieces)
2 cups chicken stock
1/2 cup sliced almonds
parsley to garnish
 
1. Preheat oven to 375 degrees.
 
2. Combine the squash, onion, apricots, chickpeas, raisins, salt and pepper in one large roasting pan or two 9"x13" pans. Toss with 1/4 cup oil to coat.
 
3. In a large bowl, combine cinnamon, cumin, turmeric, and cayenne pepper and mix with remaining 1/2 cup oil. Rub individual pieces of chicken with the oil and spice mixture and lay the chicken on top of the vegetables. (Divide chicken among two pans if using two 9"x13" pans.)
 
4. Pour chicken stock around the base of the pan(s) and bake, covered, at 375 degrees for 1 hour or until fully cooked. Increase heat to 425 and uncover chicken; cook for an additional 15 minutes until the skin is crispy.
 
5. Meanwhile, in a dry pan over medium heat, toast the sliced almonds.
 
6. To serve, on a large platter and pour the fruit and vegetable sauce over it. Scatter toasted almonds and chopped parsley for garnish.


Monday, February 24, 2014

Second Time's A Charm?

Oops, I did it again....I made it into the Man-O-Manischewitz Cook-off! A few months ago, I received an e-mail from Manischewitz telling me that this year, only past participants were being invited to submit recipes for this year's contest - their "All-Star Cook-off." I got to cooking and just knew that whatever I made was going to have mushrooms in it. After all, I'm on a bit of a mushroom kick lately, be it with appetizers, entrees, re-vamped entrees, and a million recipes that I don't post in between. There's just something about the earthiness, the caramelization when you cook them down low and slow, and the really deep flavor that they add to any dish that I can't get enough of lately.

My initial plan was to take my Mushroom Napoleons and re-do them a bit to make a very deep and beefy sauce that I'd serve over egg noodles. (The cook-off has rules about the number and types of ingredients you can use for submissions, so I needed to come up with something to fit the parameters.) But luckily I tried out my new idea on some friends and it was only just okay. NOT cook-off worthy.

So, I pored over the Manischewitz website for inspiration - I needed to see which products they offered and hope that inspiration would strike....and it totally did. I got to the page with their latke mix and it hit me: I LOVE crispy chicken + I LOVE anything with potatoes = Why not coat chicken breasts in latke mix? How awesome would it be to bite into a schnitzeled-chicken and have that amazing potato flavor come through? Done and done.

But then I needed a sauce - something deep and rich and a little different. And involving mushrooms, of course. And then, inspiration struck again. (Man, it was a good day in my head!) What goes better with latkes than applesauce?? I didn't think using applesauce in this would work....but apple cider might just be amazing and would be a great nod to that classic Jewish food combination. A little apple cider here, some mushrooms there, and a dash of rosemary for good earthy measure, and we, my friends, have Latke-Crusted Chicken with Apple Cider, Mushroom and Rosemary Sauce.

P.S. Please come out and watch the Man-O-Manischewitz Cook-off at the Manhattan JCC on Thursday, March 27. It's really a fun event and you get to try ALL the dishes!


Latke-Crusted Chicken with Apple Cider, Mushroom and Rosemary Sauce
serves 4

1.5 lb. chicken breasts (about 4 medium sized), butterflied and split in half (8 thin pieces of chicken)
1 box of Manischewitz Homestyle Latke Mix
1/4 cup + 2 tbsp. oil
2 large shallot, chopped
8 oz. sliced mushrooms
1/2 cup apple cider
2 tbsp. flour
2 cups Manischewitz Reduced-Sodium Chicken Broth
2 sprigs of rosemary, finely chopped (about 1 tbsp.)
salt, pepper

1. Pour the latke mix into a shallow dish. Dredge the thin chicken breasts in the mix on both sides, making sure to completely cover the chicken.
2. Heat the 1/4 cup oil in a large skillet over medium heat. Pan-fry the chicken breasts in the oil until browned, about 5 minutes on each side. (Add additional oil, if necessary, halfway through.) Place the chicken on a paper towel-lined baking sheet in a single layer and keep warm in a 200 degree oven.
3. Discard any residue from the bottom of the pan and old cooking oil. Add the remaining 2 tbsp. of oil. Add the shallots and sweat them for 2 minutes until translucent. Add the mushrooms and cook for 10 minutes, or until they've reduced in size and are golden.
6. Increase the heat to medium-high. Add the apple cider and de-glaze the pan. Cook for 3-5 minutes, or until liquid has reduced and thickened.
6. Sprinkle in the 2 tbsp. of flour and allow to cook for 1 minute. Whisk in the chicken stock slowly and add the chopped rosemary. Increase the heat to bring the sauce to a bubble.
7. Reduce the heat to low and allow the sauce to simmer for 5 minutes and thicken. Season to taste AFTER the sauce is at the right consistency. (If you season it before it reduces and thickens, it could get too salty.)
8. Arrange the chicken on a serving plate. Pour the sauce over the chicken and garnish with additional whole sprigs of rosemary. Serve immediately.
 

Sunday, December 22, 2013

Crispy Mushroom Napoleons

So you know all those times when you're having a dinner party and you need a simple but delicious appetizer to wow your guests? One where you can just casually reply to your guests, "oh this? You like it? I just whipped it up 10 minutes ago, no biggie"? Yeah, happens to me all the time too. But you're in luck, my friends. This is it.

I made a version of this crispy mushroom napoleon a handful of times a few years ago, but I never blogged it and probably never even wrote down the recipe. And then, this past weekend I had the opportunity to cook something a little bit more special than the average piece of gefilte fish for an appetizer. (Not that there's anything wrong with that every once in a while.) I seem to be on a mushroom kick lately, and I figured I had 2 options for the half-bottle of wine sitting on my counter: drink it up (not that there's anything wrong with that either) or use it productively in a recipe. My better judgment won out and I created a recipe that literally made me say out loud, "oh my gosh, this is so good." The deep rich mushroom sauce could be ladled on anything, but layered between crispy won tons, it was the perfect crunchy accompaniment. No question: this is going to be made again. And soon.

 
Crispy Mushroom Napoleons

serves 4 as an appetizer
 
1/4 cup vegetable or canola oil
3 shallots, thinly sliced
10 oz. sliced mushrooms
1 tsp. dried thyme
1/2 cup red wine
1/4 cup flour
1 15-oz. can beef broth
salt and pepper
 
vegetable or canola oil
won ton wrappers (4" wrappers, or egg roll wrappers cut down to size; 3 per serving)
 
1. Heat the 1/4 cup of oil in a skillet over medium heat. Add the shallots and mushrooms and sauté for 10 minutes, or until golden and caramelized.
2. Sprinkle the dried thyme over the vegetables and cook an additional 1 minute.
3. Add the wine and simmer until reduced, about 2 minutes.
4. Sprinkle in the flour and stir to coat; cook for 1 minute.
5. Slowly pour in the beef broth and whisk. Bring to a boil and then simmer for 5 minutes, or until thickened. Season with salt and pepper.
6. In another skillet (or later, in the same skillet), heat 1 inch of oil over medium-high heat. Drop in the won ton wrappers one-by-one and fry on both sides for 30 seconds, until golden. Remove to a paper towel-lined pan to drain.
7. To serve: place one fried won ton in the center of a small plate. Ladle on some of the warm mushroom mixture. Repeat twice until there are 3 layers each of crispy won tons and mushroom sauce.
 

Tuesday, December 10, 2013

Chicken and Mushroom Sauce II

I'm just going to state for the record: I miss snow days. After spending my entire schooling in snow-scared Pennsylvania and Maryland, and then working in Baltimore for five years (where the schools shut down if there are flurries) I'm still not used to this whole suck-it-up-and-take-the-subway-to-work-despite-the-blizzard mentality in NYC. (Okay, 2 inches of snow hardly equals a blizzard, but today would have been an amazing day for hot chocolate, or grilled cheese and tomato soup.....)

But I digress.

This past Shabbos, I had some people over for Friday night dinner and I knew exactly what I wanted to make: chicken with mushroom sauce. Can't tell ya why - I just really craved it. But, as delicious as it is, you do need a good hour to make it - to pound out the chicken and cut it up and dredge it and pan fry it and make the sauce. And last week was not exactly conducive to having excess time on my hands - especially with Shabbos starting at, like, noon or something. But I still wanted those flavors, so I whipped up something new (nothing like experimenting on my guests!) and, if I may say so myself, I think we have a hit on our hands. The gravy was almost like a southern country gravy - thick and hearty, and with the addition of potatoes on the bottom and mushrooms on top, all you really need is a salad on the side and you've got yourself a full meal. (Not that I'd ever only serve a salad on the side here!)

A few notes: In my recipe, I included instructions on how to garnish this - which I completely forgot to do when I served it! I even had the lemon all sliced up and pretty, and the parsley all chopped and ready to go. Oh well, it still tasted great. Also, I could also see myself adding a thinly sliced onion to the bottom of the pan with the potatoes the next time I make this - I'll do that and report back!

Additionally, this sauce is thick - it's supposed to be. If you like a thinner sauce, just dilute it with additional chicken stock, or don't use all the flour in the sauce part of the recipe.


Chicken with Hearty Mushroom Sauce and Potatoes
Serves 8-10

12 pieces of chicken (whatever configuration you like - I used a combination of breasts, thighs, and legs) on the bone, skin removed*
1 cup of flour
3-4 potatoes
2 1/2 cups chicken stock, plus additional 
1/2 cup soy milk
1 tbsp. crushed garlic
3 tbsp. mustard (Dijon is recommended, but all I had was yellow)
2 tbsp. lemon juice
16 oz. mushrooms, sliced
Salt and pepper
3 tbsp. margarine

1. Preheat oven to 350 degrees.
2. Slice the potatoes very thin and shingle them in a roasting pan.
3. Dredge the chicken lightly in flour. Lay it out in one layer over the potatoes.
4. Take the remaining flour (about 1/2-2/3 cup) and transfer it to a bowl. Whisk in 1 cup of chicken stock until it's a smooth paste. Add mustard and garlic and combine. Incorporate remaining chicken stock, soy milk, and lemon juice. Season with salt and pepper.
5. Scatter the mushrooms over the chicken. Pour the sauce evenly over the chicken. Take the margarine and break off little pieces to scatter over the chicken, as well. Bake, uncovered, for 1 hour, adding an additional 1 cup of chicken stock around the edge of the pan after 30 minutes. (At that point, baste the chicken in the sauce.)
6. Turn the oven to broil and broil chicken for 10-15 minutes, until browned.*
7. To serve, place chicken pieces on a large serving tray, and top with mushrooms, potatoes, and sauce. Squeeze one lemon over the dish and top with fresh chopped parsley (optional).
*I removed the skin from the chicken and, as a result, it did not brown up as nicely as I wanted it to in the oven - which is why I ended up broiling it at the end to crisp up the top a bit. (I didn't want to keep cooking the chicken for too long and dry it out.) If you like skin on your chicken, don't remove it and it should get brown in the oven on its own.
 

Monday, December 9, 2013

Comfort Food 101: Roasted Tomato Soup

Well, it was bound to happen - it snowed yesterday. Not nearly as much in NYC as in Maryland, my old stomping grounds, but there was definitely a little bit that stuck! I was driving with some friends earlier in the day and you could just see that the snow was a'comin! So I declared that it was a "pajamas and sweatpants and tomato soup and grilled cheese and hot chocolate night."

So, a few people came over and we had a whole "grilled cheese bar" with add-ons (caramelized onions, tomatoes, basil, different cheeses) that I grilled up fresh, and I had a huge pot of fresh from-real-chocolate (not powder!) hot cocoa for dessert. But the real crowd-pleaser was the fresh roasted tomato soup that I made - perfect for dunking those grilled cheese sandwiches! No cans, no tomato juice - this was the real deal and it was oh-so-good.

I came up with this very simple recipe after looking at a bunch of well-reviewed recipes online and put my own spin on, what I think, is going to be on a pretty constant rotation in my apartment this winter!


Roasted Tomato Soup
Serves 8

5 lbs. of tomatoes, any combination of varieties (I used beefsteak and Roma, because that's what was available at a decent price)
1 large white onion, peeled and cut in quarters
8-10 garlic cloves, whole and peeled
Olive oil
Salt and Pepper
6 cups of vegetable stock
10-15 fresh basil leaves
1/4-1/3 cup of sugar (depends on the tomatoes; I used a full 1/3 cup)
1/2 cup light cream, optional

1. Preheat oven to 425 degrees.
2. Cut tomatoes in half (if they're small-medium sized) or in quarters (if they're large) and scoop out a lot of the seeds, leaving as much of the pulp as you can. Scatter the tomatoes on a large sheet pan in one layer.
3. Add the onion and garlic and toss in a drizzle of olive oil, salt, and pepper. Roast for 45 minutes, until soft and caramelized.
4. Transfer tomatoes, onion, and garlic to a large soup pot. Add vegetable stock and basil.
5. Cover and bring to a boil. Lower heat to medium-low and simmer for 45 minutes.
6. Using an immersion blender, process the soup until it's smooth. (If using a regular blender, process in batches.)
7. Taste for seasoning and add salt, pepper, and sugar, to taste. (Optional: add light cream and stir.)

Monday, October 28, 2013

Pumpkin Cranberry Cookies

It took a little while, but it's finally fall. Big time, fall. With the holidays seemingly coming in during beach season, and the weather staying a perfect-for-outdoor-drinks 70 degrees for, like, 3 weeks after we finally got back to 5-day work weeks (what is up with a 3-day yuntif, anyway??), it seemed like fall would never hit. And now it has.....which I'm actually excited about! I am thrilled to finally get to break out my scarves and sweaters and boots! Ah, so many boots :-)

Anyway, if you've seen, pretty much, any post on this blog, you know that I love pumpkin. I love that it's not too sweet, I love that it pairs with spicy flavors like cinnamon and nutmeg, and I love that anytime I make a pumpkin pie, I immediately think of my family and celebrating my father's birthday with his favorite dessert.

When I hosted Shabbos dinner last week for friends, I made a chocolate dessert - an intensely chocolate dessert. It was a "brownie pudding," which is another way of saying "a totally underdone chocolate lava cake that you serve warm and oozey with whipped cream on top." Totally easy and totally decadent, but totally not my speed. I'm just not a chocolate person. Pair it with peanut butter, and I'm good to go. But on its own? Meh. I need something else to counterbalance the overly rich chocolate fudginess. Pumpkin is my go-to flavor for fall, and since I had just been to Costco two nights earlier and bought the largest bag of Craisins ever (hey, the huge bag at Costco costs less than the regular bag at the supermarket! Totally worth it), I decided on pumpkin cookies with cranberries.

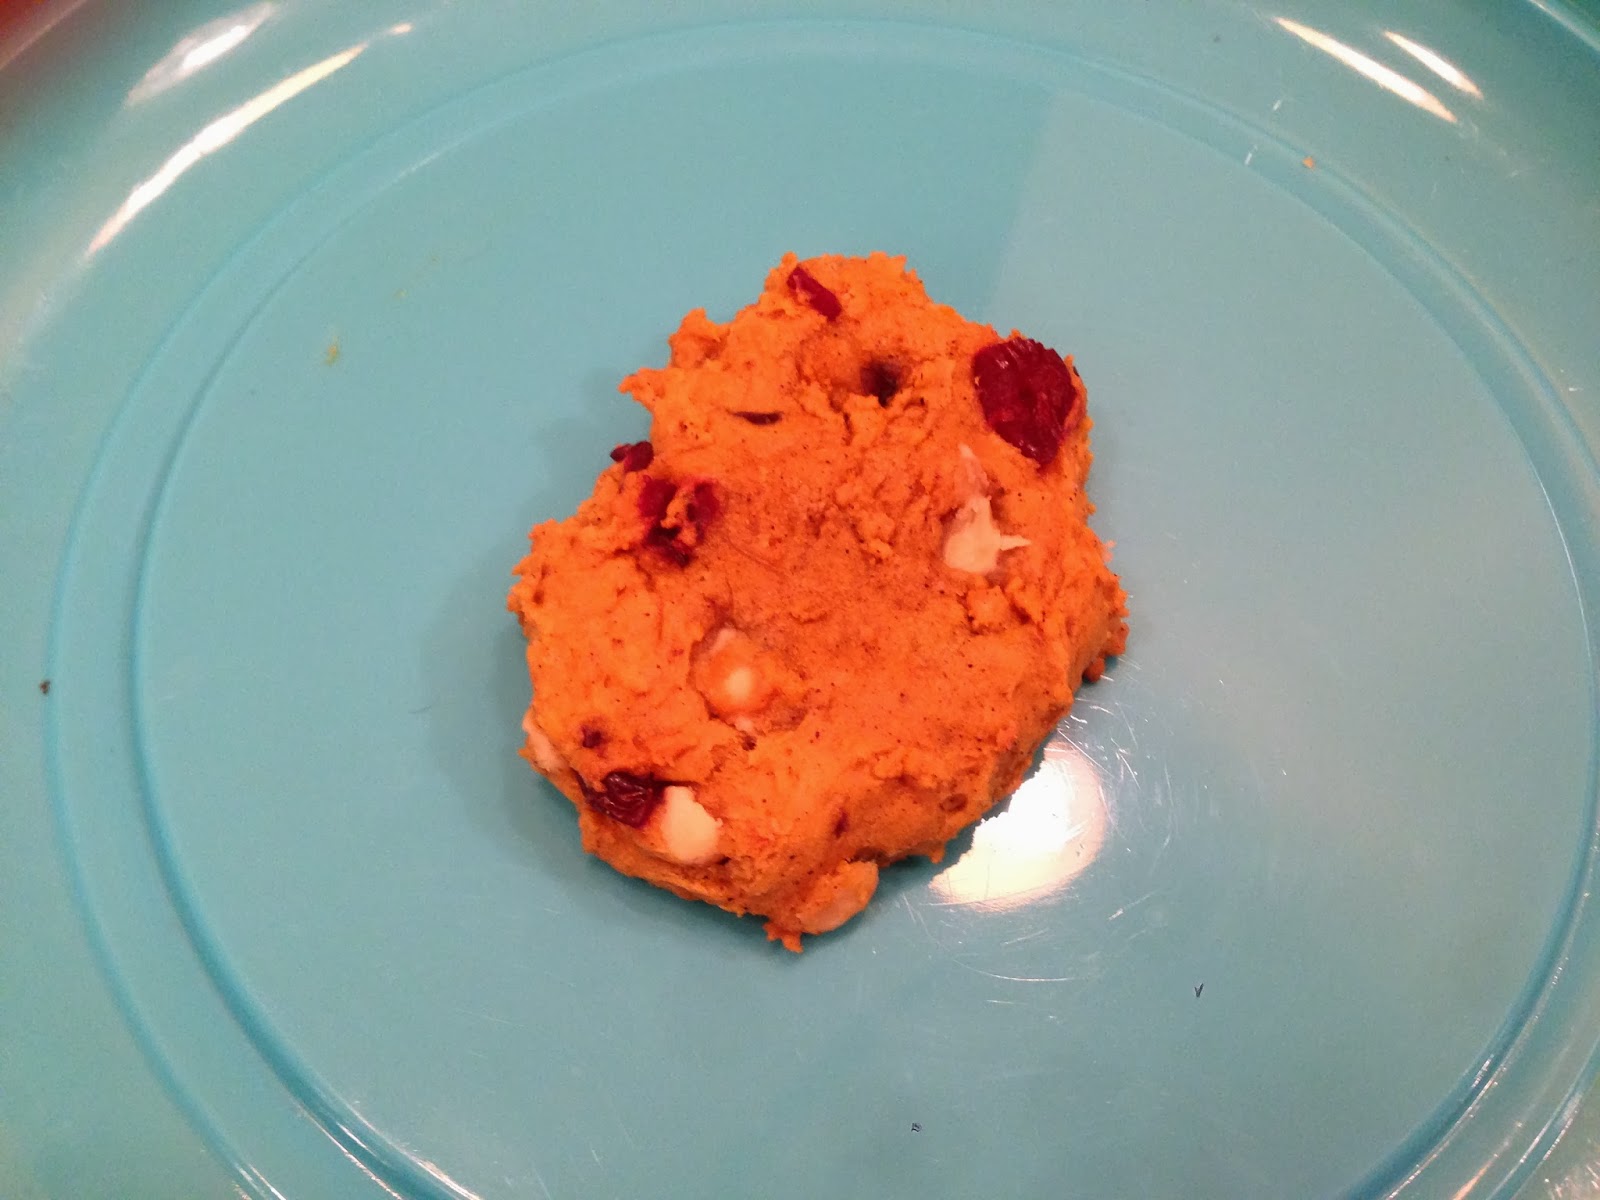
Now, baking needs to be precise (cooking is an art, baking is a science) - more precise than I generally am. So I decided to follow a recipe.....well, sort of. I found a recipe that just seemed...meh. So-so. So I doctored it up, made a few substitutions here and there, thought I screwed up the entire thing, and then ended up loving the results. The cookies have this very deep spicy flavor, with lots of pumpkin in there, and they are ridiculously soft. I've had leftovers slowly depleting in my apartment for a week now and they're still little pillows of goodness all these days later. I would normally not post someone else's recipe, but since I took so many liberties, they're mine now :-)


Cranberry White Chocolate Chip Pumpkin Cookies
makes approximately 30 cookies

1/2 cup margarine (1 stick), softened 
2/3 cup white sugar  
1/3 cup brown sugar
1 teaspoon vanilla extract
1 egg
1 cup canned pumpkin puree
2 1/4 cups all-purpose flour
2 tsp. baking powder 
1 tsp. baking soda
1/2 tsp. salt
1 1/2 tsp. cinnamon
1/2 tsp. nutmeg
1/2 tsp. ginger
1 cup dried cranberries
3/4 cup white chocolate chips 

1. Preheat oven to 375 degrees.

2. In a large mixing bowl, cream margarine and sugars until light and fluffy. Beat in vanilla, egg and pumpkin. 

3. Add 1 cup of flour and mix until incorporated. Add remaining flour, baking powder, baking soda, salt, cinnamon, nutmeg, and ginger and mix until fully incorporated. Cut the cranberries in half and stir into mixture along with the white chocolate chips. The dough will be sticky, but if you allow it to rest for about 5 minutes, it eases up. 

4. Drop rounded tablespoons on a greased cookie sheet and bake for 10 to 12 minutes, flattening the cookies halfway through the baking and rotating the cookie sheet. They should  be very soft when they come out of the oven. Flatten them lightly one more time as soon as they come out of the oven.

*Editor's note: These cookies don't spread very much and they're a little too puffy for my liking, which is why I flatten them twice. If you want a very puffy cookie, don't bother - they're still delicious, and they will "fall" a bit overnight after you've baked them.


Monday, October 14, 2013

Chocolate Peanut Butter Pretzel Amazingness


Alright, friends. What I present to you today is not exactly groundbreaking or revolutionary. Everyone knows that peanut butter = good, peanut butter + chocolate = awesome, and peanut butter + chocolate + pretzels = amazing. You all also know that peanut butter pie is on the short list of necessary baked goods in my family at any holiday or event where I am involved. This 5-ingredient pie is so easy and such a crowd-pleaser, that it's almost silly NOT to make it.

So when a peanut butter-loving friend invited me to Shabbos lunch and asked me to bring dessert, out of sheer willingness to please (read: laziness and wanting to make the easiest thing I could think of), my mind went to my good old standby. But then I was told that there would be 12 people at lunch, which is just too many for my humble-looking little pie to accommodate. That, and I have a compulsory need to impress people and, as delicious as it is, my PB pie doesn't look impressive. So I decided to amp it up. Big time. A homemade salty pretzel crust, a sheet of gooey chocolate fudge, fluffy peanut butter filling, refreshing whipped cream, more salty pretzels to accent it, abstract chocolate and peanut butter decorations on top....yeah, goodbye unassuming little pie, sayonara to my 5-minute wunderkind. This effort was well worth it.


Chocolate Peanut Butter Pretzel Amazingness

(serves a lot. Like, a lot.)


Crust:
4 cups of thin pretzels, crushed (just about a full 16 oz. bag), divided
1/2 cup brown sugar
3/4 cup margarine, melted

Chocolate Fudge Layer:
2 cups chocolate chips
3/4 cup pareve milk
1 tbsp. honey
1 tsp. vanilla

Peanut Butter Mousse Layer:
1 cup peanut butter
8 oz. pareve cream cheese
2 cups powdered sugar
2 cups pareve whipping cream, whipped

Garnish:
1 cup pareve whipping cream, whipped
1/3 cup peanut butter

To make crust:
Preheat oven to 350 degrees. In a large bowl, mix the melted margarine, brown sugar, and 3 cups of crushed pretzels (reserve the last cup for garnish) until the margarine and sugar are evenly coating the pretzels. Pat the mixture into a 9"x13" pan and bake until slightly golden, about 10 minutes. Remove from oven and allow to cool, about 5 minutes. (It will be soft, but it will firm up as it cools more.)

To make fudge:
In a microwave-safe bowl, melt the chocolate chips and pareve milk in 30-second intervals, until melted, stirring between "nukes." (It took me three 30-second intervals.) Whisk until smooth, and add honey and vanilla, whisking to incorporate. Allow to cool for about 5 minutes, and then pour over the slightly cooled pretzel crust, reserving 1/2 cup of the fudge for garnish. Place the chocolate covered crust in the refrigerator for at least one hour and allow to set.*

To make peanut butter mousse layer:
In a large bowl, mix the peanut butter and cream cheese with a hand mixer. Slowly add the powdered sugar. Add the whipped cream and beat for one minute, until fully incorporated. Pour the mousse over the chocolate-peanut butter crust and refrigerate.

To garnish:
Evenly spread the remaining whipped cream over the peanut butter mousse. Sprinkle the remaining cup of crushed pretzels over the whole dessert. Microwave the remaining 1/2 cup of chocolate fudge in a closed ziploc bag for 15 seconds (until slightly warm and runny); snip a tiny bit off the corner of the bag, and abstractly zig-zag over the pretzels to decorate. Microwave the remaining 1/3 cup of peanut butter in a closed ziploc bag for 10 seconds, and do the same. Refrigerate up to 24 hours.

*Note: This dessert has a lot of steps, admittedly. But it can be broken up into stages: the crust can be made and covered in the chocolate fudge and allowed to sit in the fridge for up to a day. (In fact, this might work out great, since you want the fudge to be pretty well set before you cover it in the peanut butter mousse.) The mousse can be added to the crust a day before serving, as well, since you want all the layers to be firm so when you cut/scoop into it, it doesn't fall into a big blob. Not that that would make it taste bad. Literally, nothing will make this taste bad. It's chocolate, peanut butter, and pretzels, for G-d's sake!